|
 NEW
YEAR RESOLUTION FOR HEALTH: DOING SIMPLE
TAI CHI NEW
YEAR RESOLUTION FOR HEALTH: DOING SIMPLE
TAI CHI
by Wei
(Willa) Bian, assistant professor,
Slippery Rock University
For most
areas in the United States, New Year's
Day means the beginning of the cold
weather. People start to spend more
time at home and less time outdoors.
Tai Chi is one of the exercises people
can practice in a place that does not
require a lot of space. They can do
it at home, in the porch, or even in
front of the TV set.
You may
ask, "What is Tai
Chi?" Tai Chi is a slow motion
exercise with forms that root from Chinese
martial art practiced over three hundred
years. If you would like to know more
about the history of Tai Chi and its
many styles, please visit History
of T'ai Chi Ch'uan.
Tai Chi is
an exercise that shows many health benefits
including:
1. Lowering of high blood pressure
2. Improving balance and flexibility
3. Reducing stress
For more
information about Tai Chi's benefits,
please visit Health
Benefits of Tai Chi and Qigong.
When performing Tai Chi, the body weight
is usually transferred from left to
right or from forward to backward. Knees
and arms are bent. Here
are ten important concepts and areas
you need to pay special to while practicing
Tai Chi.
Depending
on how many Tai Chi forms you want to
learn, learning and performing Tai Chi
can be complicated or simple. An entire
exercise is a set that range from 16
to 108 forms. Physical education teachers
can use Tai Chi to introduce activities
in classes to integrate multicultural
education, movement concepts, and non-locomotor
activities. In addition, they can provide
students task sheets (see the example
by the end of this article) and ask
students to practice simple Tai Chi
forms outside the physical education
classes. Furthermore, students can share
what they have learned with their family
members to promote physical activity
participation at home.
Before we
learn and practice simple Tai Chi forms,
please remember the three cues for doing
Tai Chi:
Bend:
Keep arms and knees bent. Joints should
not be fully extended.
Round: Keep all motion
pathways curved.
Continuous: Practice
Tai Chi forms with fluidity and keep
a sense of flow in motion patterns.
The end of one movement is the beginning
of the other.
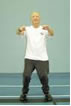
Form
1. "Painting the Wall"
Movement
concept: Directions up and
down.
Ready position: Stand
with feet shoulder width apart. Toes
point forward and hands are open naturally
and placed at both sides of the body.
Motion path: Gradually
lift up arms, palms down, to shoulder
level. Arms are slightly bent with sunken
elbows. Then, press both hands downward
while squatting with knees bent to the
range of 100 to 160 degrees, depending
on leg muscle strength. Gradually lift
up arms to the shoulder's level again
and extend legs to a standing position.
Repeat up and down movements 20 times.
Breathing skill used when practicing
this form: Inhale when the
arms are lifting upwards, and exhale
when arms are pressing down.
Practicing
hints: When practicing, imagine
your hands as the brush painting up
and down on a wall. Relax and press
down slowly and smoothly as if you were
practicing in water.
Form
2. "Tai Chi Ball Movement"
Movement concept:
Directions right and left.
Ready position: In
a squat position with feet apart slightly
wider than shoulder width. Toes point
forward and slightly outward. Right
arm is bent at the shoulder's level
with palm down and left hand stays close
to the bellybutton with palm up. The
position seems to hold a giant beach
ball with the right hand on the top
and the left hand holding the ball at
the bottom.
Motion path: Gradually
shift body weight to the left while
placing 70 percent of body weight on
the left leg and 30 percent body weight
on the right. Extend right leg when
right hand gradually moves from the
top of the imagery Tai Chi ball to the
bottom, and the left hand moves from
the bottom to the top. Then shift body
weight to the right side with right
leg gradually bent, and left leg gradually
extends. Move right hand in a curved
pathway from the bottom of the imagery
Tai Chi ball back to the top and the
left hand goes to the bottom. Repeat
right and left shift movements for 20
times.
Breathing skill when practicing
this form: Inhale at the beginning
of the sideway shifting movement; exhale
before the completion of the shifting
movement.
Practicing hints: When practicing,
imagine your hands are holding a giant
beach ball. You need to alternate both
hands at the edge of the ball from the
bottom to the top, and vice versa, constantly.
Imagine that with right hand on top
and left hand at the bottom, one is
rotating the beach ball without losing
contact. One performs a clockwise rotation
when the right hand goes from top to
bottom, and vice versa, when the right
hand returns to top.
Form
3. "Pushing and Pulling"
Movement
concept: Directions forward
and backward.
Ready
position: Stand in a straddle
position with one foot in front and
another foot stays behind. The toe of
the front foot should point forward
and the toe of the back foot should
point 45 degrees outward. Make sure
the position allows you to maintain
a stable base. Place both hands palms
forward and arms at shoulder level.
Elbows are bent and the upper body remains
straight and restrains from leaning
forward.
Motion
path: Gradually shift body
weight backwards while pulling hands
closer to the body. When pulling back,
hands move back towards the chest with
palms facing each other. Then hands
turn upright with palms facing forward
again. Keep both hands in an upright
position in front of the chest when
70 percent of body weight is on the
back leg.
During the
weight shifting, the front foot needs
to lift its toes to allow the front
leg to rest on its heel. This position
looks like a person sitting on the back
of the squat leg. Next, start to gradually
shift body weight to the front back
to the straddle position. When shifting
body weight forward, push both hands
away from the body at the chest level.
The most important thing is the upper
body: stay upright and don't lean forward.
The motion path of the pulling and pushing
movement makes an oval circle in the
midsagittal
plane. Repeat pulling and pushing
movements for 20 times and then switch
another leg to the front.
Breathing
skill when practicing this form: Inhale
when pulling backward, and exhale when
pushing forward.
Practicing
hints: When practicing, imagine
you are sitting in a rocking chair rocking
back and forth while keeping the upper
body straight instead of leaning with
the direction of the movement.
Here is the
self task sheet that students can take
with them to practice the forms outside
of physical education classes.
Self-Check
Task Sheet
Find a personal space somewhere at home
or outside. Perform the following tasks,
and circle the icon if you have met
the criteria.
Circle this
icon  if you have practiced the Tai Chi Forms
three times or more per week.
if you have practiced the Tai Chi Forms
three times or more per week.
Circle this
icon  if you have practiced the Tai Chi Forms
twice a week.
if you have practiced the Tai Chi Forms
twice a week.
Tasks
|
Images
|
Circle
the icon here |
| Performed
Form 1 "Painting the Wall"
and repeat 20 times |
|
|
| Performed
Form 2 "Holding the Tai Chi
Ball" and repeat 20 times |
|
|
| Performed
Form 3 "Pushing and Pulling"
and repeat 20 times |
|
|
Student Name:
___________________________Class: ________
Dr. Wei (Willa) Bian is an assistant
professor in the Department of Physical
Education at Slippery Rock University.
She received her B.Ed and M.Ed. from
Beijing Institute of Physical Education
and played volleyball for many years
in China. She has taught numerous courses
both at undergraduate and graduate level
as well as supervised student teaching
in the field.
Her research interest focuses on teaching/coaching
expertise, alternative assessment in
physical education, and multicultural
education. She loves children and enjoys
watching children participate in various
physical activities and games in physical
education classes. She likes to play
volleyball with her students and practice
Tai Chi at home.
|